Friday, 31 August 2012

Green Summer Distress. . . . . . . . . . .

At the Sunday Stampers, Hels has given us the challenge to make something 'green'. I'm really getting to quite like it now in my craft work so, great I think, let's make something green. . . . couldn't think of anything! Also wanted to make something for the Artful Times challenge using acetate and I hoped to combine the two. . . . again, zilch ideas going on.

I found a green Christmas tag I made ages ago and thought I could improve it (meaning almost redo it!!) and I was quite pleased with the result so, went over to Artful Times and I'd missed the linky thingy - can you believe it?! Sorry ladies.

To cut a long story short, I decided to start again with my summer colour distress pads and I've made a tag for Sunday Stampers and Simon Says Stamp And Show.

It's simple: kraft resist paper, stamped butterflies and dragon flies, punched flowers and although it's not as involved as the usual things I do, I really enjoyed making it! No longer stomping round the house like a bear with a sore head so I'm happy, the cat's happy and that's what counts!

Here's what I made:

Finished tag with the insects only attached by the body to create a three dimensional  effect. Not sure why the bottom part of the tag looks dark. . . . . . . . 

For the background I used a piece of Tim's kraft resist and inked it evenly with mowed lawn. I originally used some picket fence too but I didn't like the chalky effect against the bright insect colours so it was put in the 'use me later' box! The edges of the tag were inked with walnut distress.
Some card was coloured using salty ocean and pickled raspberry spritzed with water on a craft sheet. All the insects were stamped onto this card in coffee archival, dried and cut out. As mentioned previously, only the bodies were attached to the tag - I always like to see the wings free for some reason! 


The letters are Tim's and were cut from the card mentioned previously. Their edges were inked with a distress marker. I love the way these three summer distress colours can change so radically depending on how much water you add - sounds daft but I'm really starting to love them - not the case when I first got them! The little punched flowers (I know, you've seen them before but I love them!!) were from the same piece of card.


You may just see some script stamped in the background in a chalky green colour to add further depth to the piece. Not sure where I'd be without that little stamp!

What I like most about salty ocean and pickled raspberry is their ability to mix so beautifully and create jewel like colours. I hope you like this too.

I'd like to say a big thank you to all those people who were so supportive about my Creative Expressions application - your comments were lovely and even if I'm not successful ( I don't expect to be, I may add!), your kind words will last long after the application is forgotten!


Thursday, 30 August 2012

Craft Barn Blog Candy!

My local craft shop is the Craft Barn - how lucky am I?? I'm often in there having a drool and I comment on the their blog posts most days. When I saw this blog candy on offer I kept meaning to post and now, finally, I've got round to it!!

You'd be mad not to make a post on this fantastic offer. If you live near enough and haven't visited yet then I suggest you do but be prepared to spend money - you won't be able to help yourself!

All the ladies are so helpful and there's loads of work around the shop to show you how the products work and simply give you inspiration. There's even a big comfy sofa or 'man creche' if you need one!

I've just attended my first class there with the very talented Neil Walker whose work you can find here.

Don't wait too long and miss out on this fantastic candy - do you think they'll give me a prize for the best hard sell tactics??!!

Tuesday, 28 August 2012

ABAC Goes Live In Five Days. . . . . .


A little while ago, I told you that I had been asked to join the design team on a new challenge blog called ABAC - Anything But A Card.

Well, the time has come to dust yourself off, put the card making aside and show us all those other fab things you make! It can be ANYTHING other than a card: tags, altered art, ATC's, bookmarks, wall art, journal pages, scrap booking, sculpture, sewing art - I think you get the picture! Grungy, cute, floral or masculine: we love it all! So whatever your style, there's a warm welcome for you at ABAC.

To entice you over to have a look, there will be blog candy made available  over the coming days (not just ONE, but SEVERAL!) and the winners will be chosen on September 16th. Candy #1 is featured to the left and others will be coming soon. Not your cup of tea? You could always donate them to a crafty friend or add them to your own blog candy offer!

You don't have to follow the blog but I'd love you to come and have a look and if you follow and join in then so much the better!

I look forward to seeing there and can't wait to see what you come up with!
We need you to enter to make the blog a success - without you, it doesn't run! Time to start creating. . . . . .

Monday, 27 August 2012

Art For Art's Sake With A Twist. . . . .

The challenge this time at Dragon's Dream is 'Art for art's sake' - we are asked to include a home made background, a quirky character(s) and a twist.

My tag has a hidden twist which will be revealed in the photo sequence!

I didn't really have exactly the type of quirky character stamp that I wanted so I've had a go at drawing my own combining it with part of a stamp image.

Both backgrounds have similarities but one includes a layer of recycled book paper - the details are below.

I have used a white gel pen much more than I ever have before and I'd like to give credit for this to my uber talented blog friend Alie. She uses one to great effect and often works on the philosophy that you just sit down and see where your journey takes you when creating - I tried to do just that this time and it was so much fun! Usually, I mull things over for ever and a day before committing myself - probably why every thing takes so long!

Don't get me wrong, I'll never be the quickest crafter but at least I won't be the last to post this time at Dragon's Dream!!

Here's what I made:


This view of my tag shows my quirky little character #1. . . . 

and here she is with her alter ego, quirky character #2! It was just a bit of fun really - the sentiment 'my mum says I'm a good girl' came first and I thought that I should make it a bit different by adding the undressed girl and questioning the truth of what was said. . . . . .

The backgrounds were made using dylusion sprays, distress inks, stamping in self colours, white gel pen and masks. 

I drew the character and gave her a hat which was stamped from a dylusion border stamp. I then scanned in the figure and printed her out to size. I used a lightbox to trace off the main outline of the girl but left her clothes off to create the second image. Both figures were coloured with pencils.
If you look carefully, you can see some of the stamping in the background. Little die cut flowers are scattered on the first tag to give the 'sweet and wholesome' feel. . . .


The arrow was stamped and embossed in white. All sentiments were made on a label maker, inked and heated around the edges to turn black. If you look hard you will see some stamping in the background amongst the text.
You can see the jump rings on the left hand side of the photo which join the two tags.


I hope you enjoyed seeing my attempt at 'art for art's sake' and that you like it - it was certainly great fun to create!

Saturday, 25 August 2012

Texture With A Steampunk Theme. . . . .

I noticed a few weeks ago that there was a Design Team Call at Creative Expressions. I've been deliberating on this - as I do - and have finally decided to put in an application.

Whilst making my piece for Sunday Stampers, I thought I could use this to demonstrate my use of stamping and texture for the challenge at Creative Expressions. The theme chosen by Hels this week is 'Steampunk' and I love this theme so hope the tag I've made fits the requirements for both. I'm also going to enter my tag at Simon Says who have an 'no rules' theme this week.

I love stamping and building texture into my work and I'm constantly learning new techniques and tricks. I've gone back to one of my great loves this time though: embossing with powders and folders. I've also had a go at using Tim's kraft resist technique with picket fence stain - got into a bit of mess with that one but attempt two was better than the first!

Here's my tag and yes, there are flowers - of course - but no glossy accents! Hope you like it:

The completed tag which was made on a base of TH Kraft Resist substrate. I really like this product but I haven't quite mastered his technique with the picket fence stain yet - I'm probably too heavy handed!

Die cut flowers from kraft resist. Each layer was coloured with distress stain, distress inks, stamped with a vintage man image and finally embossed with aged silver enamel. Two die cuts were then layered to create the flower and attached using a brad.

The base layer was covered with a piece of embossed kraft resist which was coloured using distress ink - love the way the original varnish on the card shows through the ink. The sentiment was produced using my label maker, coloured with distress ink and the edges were heated with a heat gun - I found that this turns them black so no need to add ink! The small flowers are my favourite Martha Stewart punch - inked, shaped and a little embossing enamel melted in the centre.

A 'steampunk man' was stamped in the centre along with various other stamped images and text. I love these footprints and gave them texture by embossing after inking with clear powder. I also masked my man before stamping the footprints because I wanted them to sit slightly behind my man. Picket fence distress stain tones down the colour of both background ink and the stamping ink.

A couple of screw head brads were used on my tag - these were embossed with enamel before being attached to give them a more aged look. I was going to do this to the smaller brads in the flowers but didn't - wondering if I should have done this now??

This image shows another 'flower' steampunk style! The lower part is a die cut and the top layer is a wooden cog. The cog was embossed with three layers of enamel and before the final layer set, I stamped the footprint stamp into the molten enamel to create additional, relevant texture - I love doing that but always hold my breath before I've checked that my stamp has survived! The flower centre is another brad treated as explained previously.I stamped an image of a compass type thing under the flower and embossed it with clear powder so that it blended in with the existing resist images.
A silver ball chain was added to complete the look.

I hope you like my tag and please keep your fingers crossed that the people at Creative Expressions like it too! Good luck to Buttons who I know is applying for one of the posts too and to all the other crafty people who put in an application.


Tuesday, 21 August 2012

A murder of crows, a blue moon and an ill wind - what a nightmare!

The challenge at Dragons Dream TIO this week is quite dark compared to the last Alice theme. We are asked to include a murder of crows (always wondered about that one!), a blue moon and an ill wind to create a nightmare.

I have struggled with this one because it is slightly outside my box: no flowers, no gold and no crow stamp just to name a few!

On my tag I have tried to capture the scary image of a murder of crows coming down with their claws out ready for action. . . . . . . . I had a little old moon stamp and for the wind I added some lines stamped with fruit packaging - the sort that is like a lattice net made from pliable polystyrene -  if you know what I mean!!

I have purposely kept my colour palette limited to shades of blue with a little black soot for good measure! However, I did manage to get the glossy accents out for this one!

A very different offering from me: hope you like it!


The background was created by blending distress inks, script stamping (not visible now!) and stamped fruit net (in the same distress colours) to give the impression of wind movement.

Stamped the moon over the first blue layer then masked it whilst darkening the tag. The letters are die cuts inked, stamped with black script and some white gel pen on the edge. I stuck them down to follow the direction of the wind and the crows.

The smaller crows were found on the internet, resized as required and printed onto card from which a tag was cut. The bottom crow was cut out, given an extra coat of black archival and then clear embossed. The other crows had glossy accents added (yay! love that stuff!). Each crow was given a white eye using the gel pen.

I think this shot shows some of the movement created by the positioning of the crows and the stamping.

I like the finished tag but it is so 'unadorned' for me that I have trouble recognising it as mine! Hopefully, it fits the bill though! I'd better hurry now or else I will miss the deadline and that wouldn't do after putting in the effort - I know, it doesn't look like much effort but trust me, it still took me ages. . . . . .!

Saturday, 18 August 2012

A Touch Of Gold With Some Flowers. . . . . . .

I have to say that I LOVE embossing powder or enamel! If it's gold I love it even more and I'm always looking for places to use it. I have to stop myself reaching for it because otherwise everything I make would feature some!

Another thing you've probably noticed is that I like to make little grungy flowers - not the beautiful multi - petalled ones that lots of you clever people make but the simple, two or three layered ones that suit my lack of flower making skills best!

I love using sprays and inks combined with stamping to make my own backgrounds too.

I love using die cuts in different ways on my projects too. . . . . . so where is all this 'love to do' leading you ask? Well, at Simon Says this week the challenge is to make something using your favourite technique and I tried, I really did, to narrow it down to one but it's impossible!! Perhaps if I said top of the list at the moment is to make my little flowers then that's probably true but at least two of the other things I've mentioned need to be there too. . . . . . . !

The challenge at Sunday Stampers (which I might just make!) is to make something Shiny - I do hope Hels thinks the enamel, perfect pearls and gold leaf coloured paste fits into this theme as I'm going to share  my work with her talented followers.

The challenge at The Stampman is Precious Metals/Medals - Olympics - Gold/ Silver/ Bronze so I'm entering my work in their challenge too.

OK, down to what I've actually been up and to and really LOVED making: my Sister Sandie gave me a little wooden box which had originally contained decorations - being a lover of all things second hand AND free, I grabbed it quick before she changed her mind!

Here's what I made with the unloved little box:

The box was painted with Claudine Hellmuth's gesso and all visible edges were coated with gold leaf paste.
Eventually, the inside of the box, not covered with home-made background card, was painted with good quality gold acrylic.


The top of the box - not sure why it looks curved as it is completely flat! All the background card used was made by using a combination of dylusion inks, perfect pearls and distress inks. Simple script was stamped using a toning chalky ink and all cut edges were inked with Walnut distress ink.

The lid slides open to reveal the interior: the base is another piece of my background card, made as described above and the 'walls' are painted but you can't see how much they glisten here due to the light and angle.

The scrolls across the lid are die cut and then given two coats of Aged Gold embossing enamel - I love this stuff because it's quite chunky and has the little black flecks which give it that grungy, aged look. You can also see evidence of the 'Forever Green' Perfect Pearls which was scattered over the wet inks.

Slightly blurred - sorry! The flowers are die cut and punched from the same background card as used elsewhere but not all the layers have been stamped. Each layer was then inked with walnut distress and some random gold pen was applied before they were spritzed, shaped and assembled.


On the internal base of the box, the same die cut as seen on the lid was cut from my card and attached for extra interest.


Here you can see the edges not covered with card are all coated with the gold leaf paste to give a quality finish. The random inking of the card pieces shows up beautifully here - how I love using dylusion ink sprays!!

Hope you like my little box - I've become quite attached to it so I hope my Sister doesn't ask for it back!! I really do appreciate how many of you pop over and see my work and then take time to leave a comment - it's much appreciated and if I can find you again, I will always pay a return visit.


Saturday, 11 August 2012

Mona Lisa. . . . .

Challenge #10 at Artful Times is to create something using the theme of Mona Lisa. Yikes!! I wasn't at all sure about this one because I don't have ANY stamps to fit the theme or indeed, any that would come close. A very kind lady (you know who you are!!) suggested that I turn to the internet for some help. I'm not one for digi stamps simply because I love to stamp with something real but I had a little look at Google Images and a little idea began to form in my aching brain.

I found my images and printed a couple off to see which I liked best. Horrors of horrors I'd almost run out of ink and my prints were the strangest hues. Not to be deterred - and unable to magic new ink cartridges from anywhere - I went ahead and printed my chosen image onto artist transfer paper and then ironed it onto fabric. I loved the effect but, if you're observant, I'm sure you'll notice something slightly odd about my Mona Lisa!! Shhhhh! Don't tell anyone else though please. . . . . .

Here's what I made using a fairly non typical pastel but distressed palette:

I used a very different colour palette to the one used on the original Mona Lisa and it's certainly very delicate compared to the colours I usually use!I will say the colours are richer in real life but the photo seems to have bleached them a little. I've tried to adjust them but to little success.
                        
I've made this image large so you can see the centre panel clearly. Mona was printed on ATP and then ironed onto cotton fabric. A little distress ink was added just around the edge of the fabric.
The background of the tag was created from glossy card stock. Using Versamark ink, a script image was stamped and dried. Various colours of distress ink were applied randomly over the surface which made the script pop out of the background. Using the same distress colours, various images were then stamped to complete the background.
I made some grungy flowers from die cuts which were coloured with dylusion and distress inks. Black gems were added to the flower centres.  The sentiment and image was stamped in archival after the background was created. I thought the sentiment was appropriate because it is said that where ever you view the painting from, Mona's eyes appear to follow you.

The lace was die cut from a scrap of the background created and then attached to the main tag using jump rings. I love the effect you achieve by using distress inks on glossy card - I usually avoid it like the plague! I don't think I'll be making jewellery in the future either because attaching those jump rings was so annoying!!

I hope you like the tag and please leave a comment if you do!

Thank you so much to those people who left lovely comments about myDT news - it was so kind of you to offer your support in that way : )


Friday, 10 August 2012

Good News. . . . .

Firstly, can a say a big hello to my new followers. Thank you so much for being here and I will be visiting you as often as I can - even if it means commenting on three or four posts at a time!

Secondly, I'm really excited and a little nervous because I've been asked to join a Design Team for a new challenge blog which is going live in September. I can't tell you how surprised I was when I read the email and even more surprised when I said yes (thanks to BJ who pushed me into it) - I think I had a case of the jitters afterwards thinking how will I ever finish anything on time!!

The blog is called ABAC or Anything But A Card - right up my street because I can now make tags until the cows come home!! (I promise not to make them every fortnight of course!)  I will be working with some very talented ladies and I hope I can come up to the mark. So, if you like creating projects which are not cards and from any or even mixed media then this is a challenge blog for you!

As soon as I can link you directly to the blog I will but it goes live at the start of September, the challenges will be fortnightly and do I hope I will see some of you over there - pleeease as I will need the support!

Monday, 6 August 2012

Paint It Up. . . . . .

The challenge at Simon Says Stamp and Show this week is to use paint. I'm really starting to love using acrylic paints and recently I made a mini canvas for a swap with some crafty friends. I used a combination of paints, spray inks, chalky ink and metallic paste to create my little canvas - with a little bling thrown in for good measure!

The theme for the canvas was nature and I had to go with flowers as I love using them in a rather grungy way. I included die cut flowers, a flourish (cut up a little)  and some texture paste through a stencil. See if you like what I made:

The completed canvas.
These are the elements used: mini canvas prepared with stuck on die cut flourish parts, texture paste flowers and colour created from gesso, acrylic washes and dylusion inks. The flowers at the bottom are die cut and  some have been glued together to give a little more depth.

The die cuts were glued on and the texture paste was added through a dylusion stencil.You can see that several layers of paint and ink have been applied to achieve the multi coloured background! Once dry, metallic paste was added randomly to edges and some flat surfaces in the design. You may also see a slight shadow around the die cut - this was achieved using a graphite stick and later some exposed areas were shaded using the stick in a subtle way.


You can see that this die cut flower was sprayed with dylusion ink, stamped with chalky ink and metallic paste was added roughly to the edges. The flower petals were manipulated with a paintbrush handle to give them some dimension before they were glued on. Stick on gems in toning colours were added for the centre of each flower.

The smaller flowers were all constructed using the method outlined above although not all  were stamped. I like the way the texture paste adds detail and dimension to the background.
Hope you like this little piece - I do seem to be using these colours a lot lately but I  love them!! I'll have to put them to the back of the drawer and make myself use something else! Thanks for visiting and a big hello to my new followers: I will visit you to say hello, just give me a little time to get there!  

A Little Extra Post 

Can I also share some images of a gorgeous little envelope that dropped on my mat a few weeks ago? My beloved moggy Frankie was diagnosed as having some kind of bone marrow problem and it would seem that he wouldn't last out the week - I'm pleased to say he's still with us and amazingly seems a bit better! My blog friend Alie from Holland knew of this so sent me a little something to cheer me up - people are so kind and even though I've only been blogging since January 2012 I feel that I have made some really lovely friends. Alie is incredibly talented and creative and if you don't know her work yet I would suggest you pop over to her blog and have a look. Here's the card and tag she sent me - even the envelope was decorated:

                                                                                      The gorgeous tag!!
Beautiful envelope and little card!


Thursday, 2 August 2012

Alice, The White Rabbit and a Situation. . . . .

The challenge at Dragons Dream TIO is to create a tag using the following recipe:

  Alice, the White Rabbit and a situation - also, use at least one stamp

My heart sank initially because I don't possess any Alice stamps or indeed stamps that could be used to  improvise! In fact, I've only appreciated the book since I've become an adult - as a child I didn't like it and my own daughter wasn't keen either.

The 'digi' stamp idea came to mind but that was a bridge too far (no offence to those that use them!) so in the end I trotted off to the charity shop to find an Alice book which I could use for images. I'm not into chopping books up but I've decided that buying one in a charity shop and then mistreating it is OK because I've contributed to a charity and the book gets a new lease of life. . . . .

Enough rambling: I decided to make a 3D tag which shows a little room beyond a door - very tricky - and I also changed the script a little for my 'situation'. My situation is this:

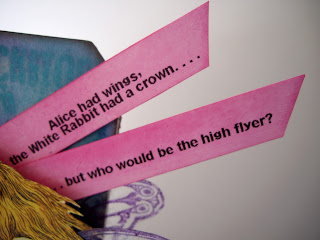
    The Queen of Hearts makes the White Rabbit a prince; Alice grows wings after drinking the potion and they have an argument about who is in the most enviable position. Alice states it's her because she is free to go where ever she pleases, whenever she pleases, due to her new wings. The Rabbit of course says it's him because he has a crown (just love the look of him wearing a crown!) and is therefore able to do anything he pleases, whenever he pleases AND it doesn't matter if he's late because everyone has to wait for him. . . . . . I can just image how many far fetched situations they could get into whilst trying to prove they are the winner in this argument!

Silly I know, but we're all allowed to dream aren't we. . . . . . .?

I'm also going to show my work at:
Try It On A Tuesday who this week have an 'Anything Goes' challenge.
Fab 'n' Funky who ask for 'Anything But A Card'.

Here's what I made:
(apologies for so many photos but I wanted to show all the bits and pieces of the design - also failed miserably to get them in the order I wanted!!)

This image shows the two 'walls' in the little room before the tag was constructed. The left wall was made by stamping a brick design using stamp rubber off cuts. The 'mortar' was achieved by embossing with crystal powder. The colour was kept light to counteract the other darker wall. The clock was stamped and inked. The dragonfly was stamped with distress markers, cut out then crackled with rock candy. The cards are a reference to the original story and were cut from the charity shop book. The dark wall was created with dylusion inks and stencil with the help of a white gel pen.

The completed tag showing Alice crouching to go through a little door which leads to a small room. Some clocks and the words 'tick and tock' are stamped into the corners - this links to the original story and the Rabbit's fixation with time.

A side view of the tag - shows that the whole piece is basically triangular in shape
(side dimensions are not equal). Sorry but this was a pain to photograph and is not as good as it could be!
This image gives some idea of the 'room' behind. The rabbit was cut from the book;  his crown has had microbeads stuck to it and some little gems as jewels - love the way his ears stick up through his crown! In true rabbit style, he has a pink eye!

More wings (so love them!) which were stamped onto acetate and embossed with crystal powder and cut out - quite a lot of the powder stuck to the wings around the design but I liked the effect so decided not to do them again. Alice also has a die cut flower in her hair which was coloured with dylusion inks, stamped with crackle stamp using chalky ink and a gem in the centre.
Lollipop flowers made the same way as the flower in Alice's hair but secured to bamboo sticks and attached. I wanted the flowers larger than life to fit in with the Alice tale.
The tag was embossed with a Tim folder, the centre of the design was partially cut out to make a door for Alice to go through. After embossing, the tag was inked with dylusion and distress inks. Some embossing enamel was randomly applied over the embossed card. In this image you can see another die cut flower in the corner but this one has no stamping only colour.


The sentiments are intended to make the reader develop their own answer to the question posed. These were made using a label maker and then inked with distress (easier than connecting laptop to printer, cutting out, inking etc.!!).
Hope you like this little bit of fun! I've really enjoyed making it. Why don't you have a dream and link up a creation to DragonsDream? The Design Team work is worth seeing even if you decide not to enter!

Thanks for looking.