Monday, 21 October 2013

Going Dutch For DecoArt. . . . . .

Hello Everyone. Thought I should announce some fantastic news formally here, even though some of you are already aware of the wonderful opportunity I've been given.

In the Spring, I was approached and asked to be part of a mixed media Design Team for the amazing company DecoArt. Primarily the approach was made by the hugely talented Andy Skinner, so how pleased was I?!! Bit of an understatement really - I was over the moon, dancing around and generally acting even more mad than usual! I am on an International Design Team and I'm sure you will know my other very talented team mates. You will find the blog here so please do go and look at the wonderful work by the team.

DecoArt manufacture a comprehensive range of fabulous products from paints for different surfaces to mediums for endless uses including wonderful mixed media pastes and finishes. Having used a number of their products on various projects, I can certainly vouch for their quality and ease of use.

I have been working on a project for quite some time now and at long last I can share it with you. As usual, it features one of my many charity shop finds - I'm addicted to rummaging in them I'm afraid!

I found a pair of wooden Dutch clogs and just had to have them. I think they are probably a tourist piece but they conjured up all kinds of ideas for me! One of the best things about having a pair of these clogs is that even though I've used one, I still have one more to play with!

This is how the clog looked before I started: (warning: this post is picture heavy!)

Sadly, I can't quite fit my whole foot into the clogs - otherwise I could have modelled the finished project for you!
Both clogs were a bit rough round the edges but nothing that a little sandpaper couldn't handle.
One half of the pair completed and looking so much better!
Die cuts, ribbon, paint, cork clay, twine, crackle texture paste and rusty wire amongst other things have been used to create the makeover.
The clog was heavily sanded to smooth the surface and remove the pattern transfers.
The front of the clog was then built up using DecoArt Texture Crackle to create a more pointed effect. 
Various die cuts, crispy ribbon, googly eyes, stick on pearls, cork clay and even some curled up painted tyvek was added to create interest and texture. 
Once everything was dry, two coats of gesso were applied. DecoArt gesso is fabulous. Thick, creamy and reasonably priced it can be used straight from the jar or watered down according to the end use.
All the die cuts were  given two coats of gesso before being glued into position.
The colours above were all used to finish the clog in varying degrees of depth. DecoArt Traditions paints have a high concentration of pigment and are fab to work with. 
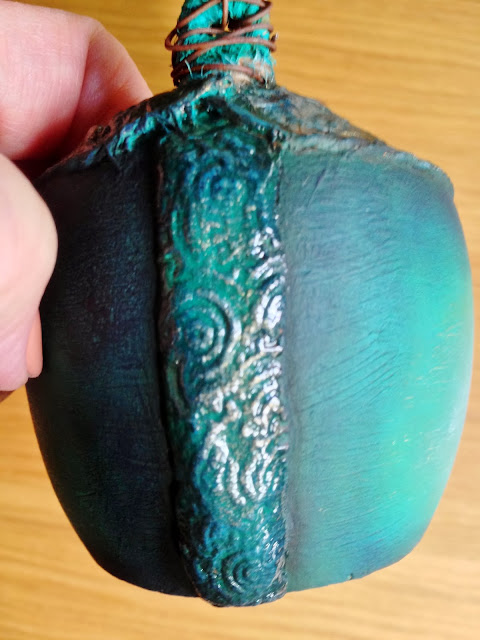
Blue Green Light and Aquamarine Traditions paints were the two main colours used as the base on the clog. Prussian Blue was then used to add shading to the surface. Warm white was later added to highlight certain areas. If you look carefully, you can see that some twine was added around the edge of the cork clay to tidy up the join. The cork clay was given additional texture by pushing random stamps into it. This gives depth and interest.
Slightly blurred but you can see the imprint of  a swirl stamp pushed into the clay in this image. This clay was coloured with a combination of the colours shown. Lastly a dry brush coat of DecoArt Metallic gold was added followed by some Triple Thick Gloss Glaze.
The crispy ribbon was dry brushed with various colours to highlight the area underneath. Finally, a coat of DecoArt Metallic paint in Venetian Gold was dry brushed over the ribbon and other areas on the project.

This part of the project was made from die cuts, 'googly eyes' and self adhesive pearls. The orange tones were created by adding a wash of Quinacridone Gold Traditions paint. If you buy one colour of Traditions I would buy this one for it's versatility. I used it here to bring definition and to work with the other colours as a complementary colour. It's fabulous for aging projects too.
Both clogs were held together with string through a hole. I wanted to decorate this hole so added a bead to both the inside and out. Like the die cuts, pearls and googly eyes, the beads were given a coat of Triple Thick Gloss Glaze.
This die cut flower was left over from a previous project. I liked the combination of the flower shades and those on the clog so decided to add it. The flower was coloured with DecoArt Americana, stamped with versamark  dusted with gold mica powder then finished with DecoArt Perfect Crackle. Some coiled rusty wire finished the look.


A metal eye was added to the back of the clog. The ends of the twine from the cork edging were secured around it, painted and then bound with more rusty wire.
I just love all these colours together!

The gold edging on the die cuts was achieved using DecoArt Metallic Lustre added with a paint brush and then buffed with a soft cloth. You can see how the Prussian Blue was used as a shadow here.

The shading with the Prussian Blue Traditions shows up well here. I also love how the googly eyes turned out with their multi layers of paint and Triple Thick Gloss Glaze.

I really had fun playing with the products on this project. It has been time consuming but great to go back to in between other projects and the dreaded packing! Thank you Andy Skinner and DecoArt for giving me this wonderful opportunity too!!

My lovely house is now in complete disarray and this time next week I will be living in my new house - really excited now but sad too to leave somewhere that I have enjoyed living for over 10 years. Please don't forget me in the meantime! I know my blogging has been erratic but I'm not quick enough to make lots of projects and line them up for scheduling (combine that with packing and sorting more than 10 years of 'stuff'' remember!!)  - I so admire people who can do this! See you all soon.


Tuesday, 8 October 2013

Tattered And Torn. . . . .

This week's challenge at Tag Tuesday has the wonderful title of 'Tattered and Torn' which conjures up all kinds of lovely messy fun.

I've been looking for sometime now at vintage images online and I recently found some amazing pictures from the east end of London at somewhere near the turn of the century (1898-1900). Why am I telling you this, well, one of those images inspired me for my Tag Tuesday piece today. It depicts a young girl sat probably on a windowsill, playing with her pet rabbit. The curtain in the window is full of holes and the little girl herself is very crumpled and unkempt looking. I printed out the picture hoping to do an image transfer but sadly, I've got hardly any ink left, it didn't work and I had to print another copy which is probably lighter than the first - grrrr!

Not to worry, I still used this poignant image and here's the tag to show you how:

More corrugated card simply because it's free and I can't resist it for texture and versatility!
A tag shape was die cut from old packaging and the top layer ripped off in various areas. DecoArt Traditions were then applied in the colours shown until I was happy with the result.

A wash of Quinacridone Gold was added - very heavy with paint and allowed to dry. Some lightening of areas took place and once happy, everything was dried  The two flat areas of the tag were stamped with a Tim stamp and coffee archival ink. Before it dried, embossing powder  in frosted crystal was applied to give it a worn finish and to enhance the stamping.

An oval was cut from scrap packaging to mount the image on. This was given two coats of DecoArt Traditions (med beige) to help the image stand out well and to smooth and seal the surface. Some lace was coloured with a watery mixture of the medium beige Traditions along with some burnt umber from the same range. Considering the lace was pink to begin with, I was very happy with the results and pleased how well the paint worked.


The middle layer is made from embossed packing card which was given a  Timeworn treatment with DecoArt Traditions paints again - it didn't work very well but I thought I'd keep it and found it came to good use on this tag!


The words were printed out on a label maker, stuck onto card and muddied with the same colour Tradition paints as used for the lace.

I couldn't resist this picture! Clearly the curtains have seen better days but it evokes many thoughts of bygone times and how they compare to our lives now.

Another small section of lace was added at the top of the tag just to ring the changes and to match the edging at the bottom.

So, that's my offering this week for Tag Tuesday, why not pop over and see what the other talented artists have come up with? The tags produced take many forms and use a wide range of media - right up my street!

Other news: we have now exchanged contracts on our house and have a fixed moving day - YAY!! Now the fun begins in earnest!

Thanks for looking at my work and I hope you enjoyed the details of how I achieved the end result.

Thursday, 3 October 2013

Beads, Butttons And Bows At Tag Tuesday. . . . .

This week the challenge at Tag Tuesday is to use Beads, Buttons And Bows. The thought of the buttons and bows filled me with horror at first! However, I put the thinking cap on and a little plan began to form.

In my 'bits' box I had an arch shaped tag which I'd made ages ago using a rust technique by Andy Skinner, a stamped lady who just happens to be one of my favourite stamps - from Soul Of The Rose plate by Oxford Impressions, a piece of crackled card and a scrap of a peeled paint technique also learnt from Mr Skinner.

I had some beads from a charity shop buy which I keep taking off a bracelet and using, some cream seam binding and of course, some rusty wire. Here's what I did with these pieces for Tag Tuesday:


Most of the mediums used to make the tag but sorry, no step by step as the tag was made from scraps!
The image was stamped onto card which had been painted with DecoArt Traditions - this makes a lovely surface for stamping on. Some DecoArt Quin Gold was stamped onto the image to give it some age.
An ATC which had been rusted and stencilled with DecoArt Texture Sand (I added a few micro beads to give extra texture before use) was used as the base for the image.

Underneath the rusted ATC is a layer of water colour paper which was coloured with water soluble wax crayons (brushed with a water brush to blend)  and then crackled with DecoArt Two Step Crackle medium. All the little flowers were cut from this crackled water colour paper too. They were punched out, shaped and layered. A little gem was used for the centres.
The words were stamped onto a scrap of card with a peeled paint finish using Versamark. Walnut stain embossing powder was then used. The edges were shaped using an on the edge TH die.


The main tag was cut from corrugated card packaging using a Tando piece as a template. A Skinner rust finish was applied. The beads were attached to rusty wire and used through the tags punched hole.

I found this little pearlised button and aged it with some DecoArt Quin Gold Traditions paint. It was tied to the bow using some natural twine.

The ribbon was coloured using the same water soluble wax crayons as mentioned previously - I wasn't sure it would work but was very pleased with the colour match I achieved. Some 'rust' spots were stamped on the ribbon using the same method as mentioned previously. In the bottom left corner you can see some texture which achieved by tearing off most of the top layer of the corrugated card but then leaving a torn edge here and there. All for free too!

Close up to show the layers - bit blurred I'm afraid!

Thanks for looking at this piece - I really do appreciate the comments you leave. Why not pop over and see what the other talented people at Tag Tuesday have come up with? You'll also find the details for joining in yourself if you want to.


Tuesday, 1 October 2013

It's Halloween - Let's Tag It On. . . . . . . . . .

Hi everyone. I'm back from the land of packing boxes for a short while to bring you the latest challenge at Our Creative Corner. 

The October challenge is to:

Make A Tag Which Must Feature Surface Texture

This could include modelling paste, texture pastes, wet or dry embossing, thick gesso with added texture - the list is endless really! The theme for your tag is:

Halloween

Just the excuse you needed to get messy with lots of different mediums, inks and anything else you fancy!

Over at Our Creative Corner, my teamies have created some fabulous tags for you so why not pop over and have a look? On the 15th October, the rest of this talented team will have some more inspiration for you so don't forget to take a look at their work too.

I love making tags and couldn't wait to get started on this one! The only things to keep in mind are that the tag must be the main project and that it should show some surface texture.

Here's my tag for the challenge - I hope you like it. I should warn you that this post is picture heavy so go and grab a drink before you start!


Finished tag made using DecoArt paints and mediums. Ink used is Archival as this works brilliantly on painted surfaces.
A large size tag (#10?) was cut from mount board and coated with Faux Finishing Medium. This seals the surface and grabs the paint. Not used this before? It's really fab and it can glue, seal, transfer images, add to paint to extend and more.
A stencil (by Andy Skinner) and some modelling paste start to add texture to the tag surface.
Further stencilling and bits and pieces are added to the background.
The whole tag was then coated with DecoArt Gesso. You can see the pastes I used in the background.
The skull on the left was stencilled using DecoArt Crackle paste. This gives wonderful hairline cracks on the surface. The diamonds on the right were die cut and added to various places on the tag.
DecoArt Traditions and Americana paints were then used to add colour using a brush and in some areas they were used for stamping. The skull is by Tando and was given a Timeworn rust finish to add age.
Some areas of the tag were stamped then finished with DecoArt Two Step crackle - just had to get some in somewhere didn't I?! The yellow spots were stamped with Americana and the black lines were applied using a credit card and some carbon black Traditions paint.
Die cut letters from grungeboard were painted and coated with DecoArt Triple Thick glaze - fab stuff for that top gloss finish!
I love that you can still see the crackles in the paste skull even after several coats of paint and crackle. The black shadows were all achieved by brushing on Pan Pastel to required depth of colour. If you look carefully here you will see lots of different stamping using both archival ink and DecoArt paints. Some with stamps and others with objects from desk!
Another stencilled skull with stamping around it and Pan Pastel shadow.
The little bat charms were applied with glue then gessoed and painted along with the rest of the background. Some carbon black Traditions paint was applied to cover the bats but the background colour was allowed to shine through. A twist of rusty metal wire was added here and there.
The top of the tag was finished with die cut, embossed and punch card strips which had the Timeworn rust finish applied. A little screw brad received the same treatment.
This diamond shape was stamped using archival ink.
The words were stamped onto acetate sheet using stazon ink then applied to the tag when dry.

Phew! I did tell you there were lots of photos. If you survived this far then well done and I hope you enjoyed seeing how I built up the layers on this tag. Now pop over to Our Creative Corner and see what the rest of the team have made. Then it's your turn - can't wait to see what you come up with!

For those who need to know: my cat has yet again weathered the storm but his meds have been increased. The move is still scheduled for the 21st but it's not set in stone yet! I've also been up to Yorkshire last week helping to clear a house - my packing skills are fab now and I'm available for a small fee for removals!!