Saturday 31 March 2012

Tags. . . . .

I do love making tags (as I've said before I'm sure) but this one seems to have taken forever and I'm not a quick crafter at the best of times!

I initially saw the challenges on The Stamp Man Challenge Blog and Simon Says Stamp and Show but then on my 'blog' hopping travels,  I saw another lovely challenge blog where I could also show my work. The is a new challenge blog called Artful Times and is run by three ladies called Sam, Von and Neet. I don't know any of these ladies but I will be having a nose at their blogs because the work they've shown on the challenge blog is right up my street!

For the Stamp Man Challenge, we are asked to select three elements from a 'bingo' card to use on a piece of work. This was where I had the most problems because I kept changing my mind. I felt that my tag fitted two different sets of criteria but couldn't decide which to choose.  Eventually, I plumped for: 'Green, Circles and Ribbons'. I hope you will see these three elements clearly displayed in my work.

Both Simon Says Stamp and Show  and  Artful Times ask us to make a tag so that was a lovely, wide set of criteria to work to!

These are most of the elements I used to make my tag.  I also used two gold 'brads' to secure the red frame on the tag but they're not shown here.
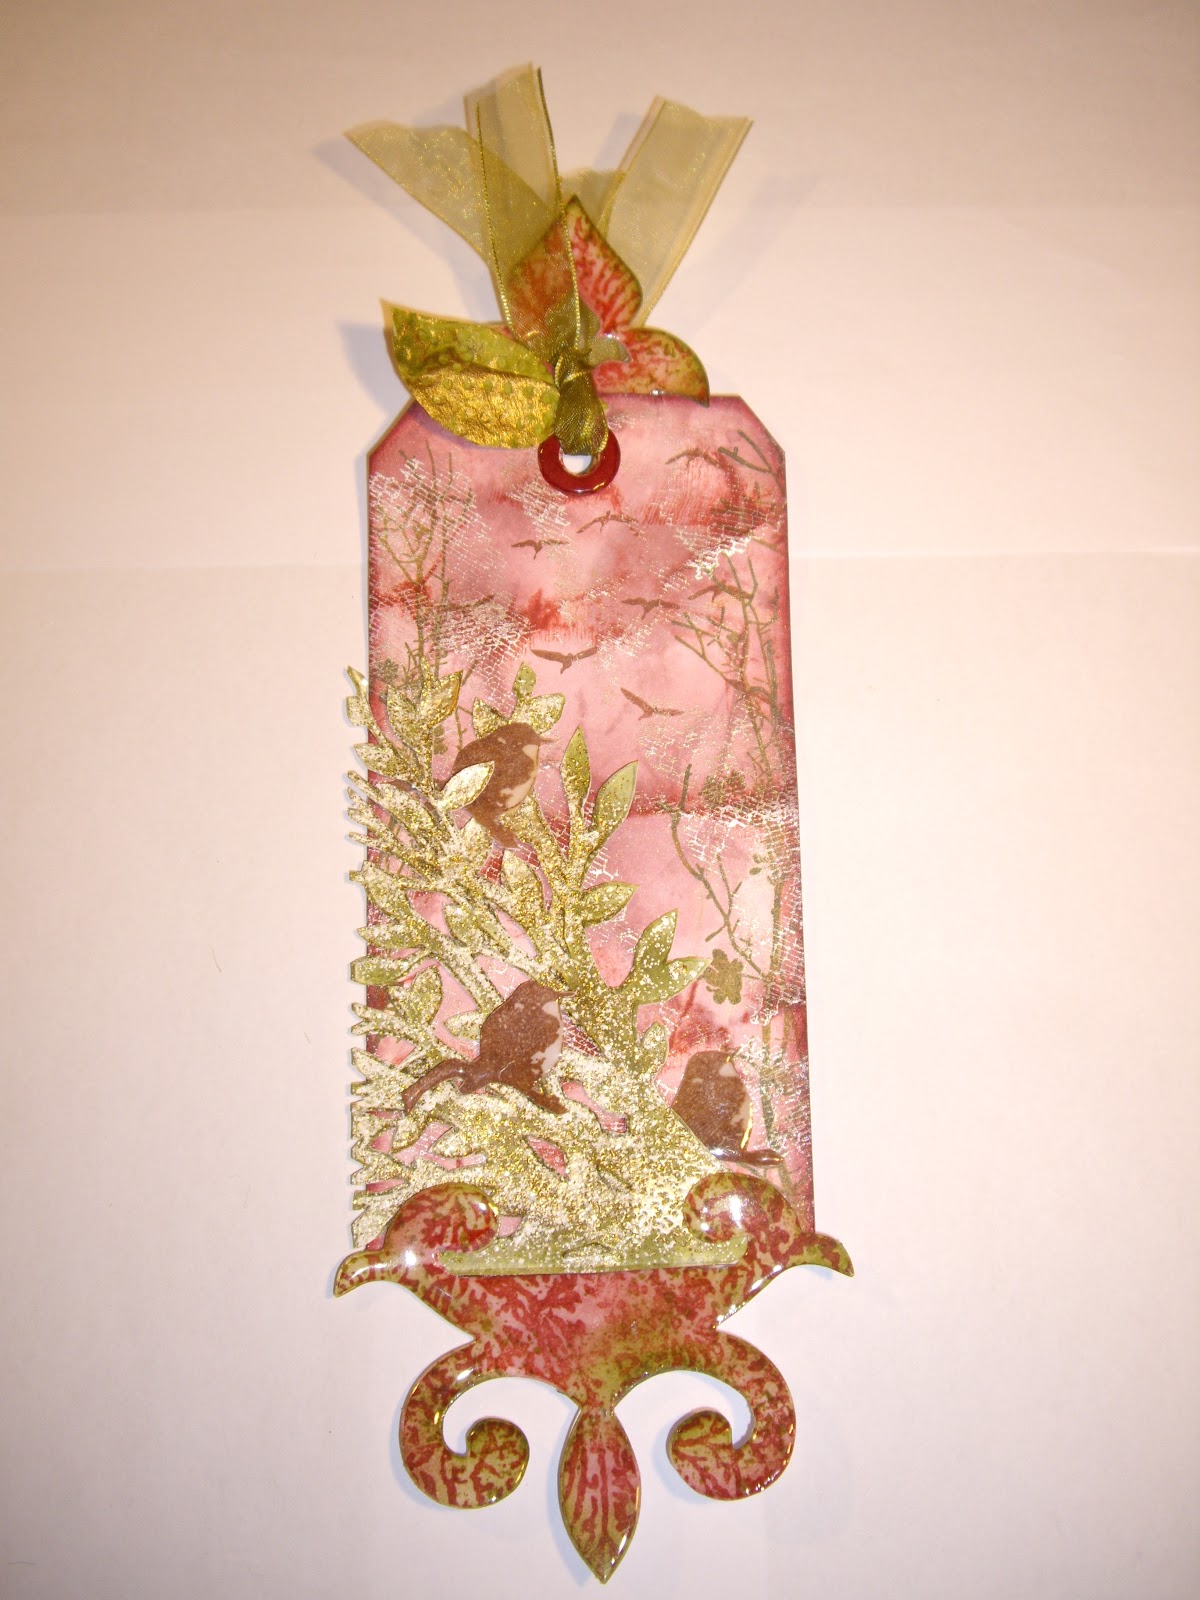
The finished tag shows all the 'bingo' elements of green, circles and ribbon.


This image clearly shows the large insect (I think it's a moth but I've coloured it to resemble a butterfly!).  The insect was painted in the same manner as the smaller one (see above) and attached by the body to create a 3 D effect. The leaves were die cut, coated with three layers of embossing powder and quickly stamped  to create a deep texture. This was the first time I'd attempted the technique and I'm sure I'll be using it again as I love the effect it gives - bit scary though with all that molten embossing 'powder'! I added the ribbon to give the impression of flight and movement. It also links in with the other ribbons used.


I used a die cut book plate secured with brads to contain the stamped sentiment. Both are coated with glossy accents. The butterfly was stamped, cut out and coloured with distress inks and a water brush then coated with GA's. I only attached the body of the insect to the frame because I hoped to created a 3D effect.


This image clearly shows the background I created using an embossing folder (TH faded texture in a circle design), distress inks and gold embossing powder.


The top of the tag is part of a die cut - the other half  is used at the bottom of the tag. This was embossed using the same folder as the main tag section. However, I inked the folder first to colour the de-bossed side to create a different texture. The raised section was inked with Peeled Paint DI then some random gold embossing was done. I inked the reinforcer for the ribbon hole and added GA as I like to make these stand out and become a feature of the design. I've added two ribbons as a final touch. They match the other ribbons used on the tag.

Sunday 25 March 2012

Handmade Backgrounds - Spring Card

The theme this week on Simon Says Stamp and Show is 'handmade backgrounds'. I love making my own background papers by stamping, painting, spraying, dry embossing and powder embossing - or perhaps all of them at once! Sometimes it's really successful and other times I look at what I've done and think 'hmmm - not sure if I like that'!

I made this background 'paper' (it's on card actually) and fell in love with it straight away. It has a slightly random, grungy look but includes lots of texture, depth and some shine - all things I seem to love!

I have included yet another of my little wooden 'ducks' as they came in a pack of four and I'm sure you'll see the other two at some time on this blog because I just fell in love with them. I'm not a particularly 'cutesie' person but obviously I couldn't resist these or the little TH rabbit which is totally lovely too!

I made the background into a 'Spring' card because that's what these colours say to me. I know some people will say they are also autumnal but I just think of the spring flowers growing in my garden now and I can see all these colours.


This is a close up showing a section of my handmade background. The card was embossed with a floral embossing folder. Colour was added using Distress Inks. The raised areas were embossed with clear powder. Random areas were then embossed with a mixture of gold and white embossing powders, heated from below the card.
The background was made into a spring card using toning colour elements of various kinds. 


These are the various elements that make up my card. All are handmade except the little wooden duck and the TH c'oredinations card.


The flowers and leaves are all TH die cuts. The large flowers were stamped before being inked and coated with glossy accents. The smaller flowers were all inked and coated as before. They are held together with small brads which I coated with nail varnish to make them look less gold. The leaves were inked once, stamped and embossed with crystal embossing powder. I then inked them again, followed by further stamping and embossing in gold to make the detail stand out. You can also see the little 'scarves' around the animals' necks!

The letters are a TH die cut. They were stamped in green with a foliage image then inked and coated with clear embossing powder. The edges have been inked in walnut DI.

This close up shows the detail on the leaves and a little more of the background 'paper'.


I intend to show my work here too:

Tuesday 20 March 2012

Goosey

One of my sisters lives in rural Normandy in a very beautiful, peaceful spot. She runs the Gite St Vigor which is housed in a lovely old barn, full of history.

She has a huge menagerie of animals including seven dogs, a cat (I think there's only one left sadly), chickens and geese - there may be more but these are the ones I know of!
Bonjour les oies!
Honk honk! (not sure what that is in french!)


The inspiration for my tag this week are her geese. I have always loved geese (at a distance!) and have a number of pictures of them in my house.

I used the colours of spring flowers such as daffodils and tulips as the inspiration for my flowers and indeed my general colour scheme. I know people always think soft pastel colours for spring but what about the bright yellows, oranges, pinks and purples to name but a few that are in evidence at the moment? I love these almost violent colours and they really show the world of nature is coming alive after the winter.

I fear that my 'goose' may be a duck but a little imagination goes a long way!The photo is a little dark but if you look further down you can see some areas of the tag in a better light! The little wooden butterfly has been painted using acrylic and DI to help him blend in with the other elements of the tag.
The elements used to make my tag. The little wooden 'goose' was found in my local garden centre and some how found it's way into my basket! The little wooden butterfly and the beaded pin are not here as they were added later to my tag.


I used inks, stamping and acrylic paint on the background. The flowers, leaves and letters were die cut and inked. Embossing powder and stamping gives interest to the flowers and leaves. The beaded pin just visible on the left was made using a jewellery finding and some beads.

The beads have been attached using clear nylon thread - I prefer to do this rather than using glue. The leaves have been detailed using embossing powder and some coloured pencil.

I'm going to show my tag here:

Sunday Stamper - Paper roses / flowers
Tag Tuesday (shown on my blog as I'm only a visitor there!)


Thursday 15 March 2012

Using 'Mists' - Cassidy's Birthday Card

This is the card I made for a crafting friend, Cassidy. To help us theme her cards we were told she liked dolphins, cats, hedgehogs, pink and purple. (There were probably more but they've escaped me!).
I had a mass panic as I don't have anything to do with ANY of those lovely creatures - except my own gorgeous cat Frankie (featured to your left!) - I certainly wouldn't plaster him with Distress Ink and glimmer mists as he's beautiful enough already!

I then heard that Cassidy likes anything quirky and I know she uses the dreaded 'cogs and gears' in some of her work. I say dreaded because I don't 'get' them at all!! I like what other people do with them but they always make me want to ask 'Why???'.

To cut a long story short, I found an inexpensive embossing folder and some very attractive stamps with cog filled flowers - even I liked those! The following pictures will show you what I came up and I was quite pleased with the finished result. I wanted to make it slightly wacky and unlike anything I've ever produced before. Did I succeed? You'll have to decide on that one.

I used loads of cosmic glimmer mist in various shades to pick out the texture of the embossed 'cogs'. I thought I would show this piece  for the challenge at The Sunday Stamper.

The completed card - the image is a little dark and doesn't give a clear view of the shimmering colours but hopefully you get the idea!


This image shows a close up of one of the flowers I made from acetate. I stamped the image using Stazon and cut out the flowers and leaves when they were dry. I secured the flowers using heart shaped brads which I coloured with permanent marker pen - I don't have any alcohol inks for that : ( !


Here you can see one of the acetate flowers before I secured it to the card. I shaped it by using a heat gun and pushing the softened flower into a pencil sharpener lid! A tricky business and one of my flowers shrank to the size used in a doll's house because the gun was too hot!

You can also see the inner layer of the card which I stamped with Distress Ink and water to soften the image.

The black and lightly coloured layer in the left corner is the main background layer of the card. I also used a piece of sanded and inked C'oredinations card.

In this image you can see the layers of the card more clearly. The lettering is of course a TH die. I inked each letter and sprayed loads of shimmery mist over them. With a final coat of glossy accents they looked as if they'd been painted with pearly nail varnish!

Mad March

Over at Tag Tuesday the theme this week is 'Mad March'.

I used to live overlooking a secluded bay in Pembrokeshire,West Wales - nothing much there except some holiday flats and the post office. What was there, were the most amazing sand dunes leading steeply down to the shore. We used to walk our dog down there and at weekends when we took him out early, we always saw loads of wild rabbits playing and scampering around - until they got wind of us and the dog and then off they went! This theme reminded me of those gorgeous times and although I didn't see any hares, these thoughts were the inspiration for my tag.

 I don't have anything in my stash related to animals, at least that's what I thought! I then remembered the free stamp that came with the latest issue of Craft Stamper and decided it was perfect - and it really is the only animal stamp I have!

I tried to show the boxing hares set as a silhouette against a spring sky with delicate blue hues and that lovely soft spring sunshine. Mmmm....in 'real life' you can see the delicate colours easily but given my photography skills, it's a little more difficult to see them!

At the base of the tag, I tried to create a dense undergrowth look by adding dark DI colours with some random foliage stamping which I then embossed with a matt powder - it's a very old one I have called green topiary (I think).

In the sky I added some stamped birds flying in formation to try to give further depth to the scene.

The letters at the bottom are very shimmery as I used loads of cosmic shimmer mist before inking them and adding glossy accents (love that stuff!). I'm afraid two letters are not exactly correctly placed but I hope you'll forgive that one!


The background colours of the sky are a delicate blue and yellow just like a spring morning but in the photo they do look a little washed out!

A slightly fuzzy shot but I think it shows the hares nicely framed by the plants some of which are on the original stamp and the others I added to give a layered look. The embossing picks out some of the plants but I didn't want a completely embossed area here so I did it in stages.


Really love how the birds give depth to the scene, framed by the trees just coming to life with leaves on the right hand side image.
Oh well, I've had a go and I like the tag as it holds lovely memories for me of the sea, the sound of the waves and the gorgeous little rabbits. I don't see much of that in suburban south London!

Monday 12 March 2012

Vintage - Yippee!

The theme this fortnight on the  Stamp Man Challenge Blog is 'Vintage'.

For me, vintage means anything Victorian / romantic / Pre-Raphelite Brotherhood / William Morris and that's just to name a few! I love the richness of the designs, the colours, the fabrics, the textures and even some of the 'over the top' designs they were so famous for in the Victorian era.

I thought for a while about what I would do for this challenge. My starting point became the lovely 'La Blanche stamp I have which features a young girl and some flowers (sorry - don't know what it's called: probably 'Girl With Flowers'!). Rather than use my usual colour palette of choice (pretty obvious from my blog work I'd say!), I decided to choose violet and green. I know that the Victorians loved both violet flowers and the perfume extracted from Wood Violets. I believe those two colours work well together and for extra impact, I have included a very small splash of yellow in my flowers. The green I chose leans towards the yellow spectrum rather than the greens which have a blue hue.
These are the elements which make up my card. Each individual element is described below except for the two layers of TH C'oredinations card I used as background mats. Both layers were sanded around the edge and finished with Distress Inks. To hear how I made the other layers and components please read on!
In this image you can see the tinting I have done on my stamped image (stamped using sepia and a chintz image which I love). Some of the colour has been done with Distress Inks and other areas use coloured pencils (I love colouring in!). I also added Glossy Accents to most of the tinted areas to give them more impact against the rather strong sepia coloured background. The edges of the layer were finished with Distress Inks.
I die cut the flowers and stamped with sections of floral images. I tinted the edges with Distress Inks and added a little splash of yellow in the centre, to enhance the violet colour. The stamped flowers were then coated with Glossy Accents. Some wired beads were added to the centre of the flowers for detail and what vintage item doesn't have some form of 'bling'?!  Rather than use die cut leaves, I added organza ribbon loops in a toning green to give richness and again to be faithful to the vintage theme. Perhaps I should have included lace but I felt that would be one step too far. (Even for me!).

I stamped the girl image and removed the piece I wanted. I added some stamped 'spots' to give the image an aged feel. A coating of Glossy Accents finished the job. The frame was part of another stamped image which I cut out. I coated the frame with a layer of metallic acrylic paint and some black Stazon to try to give an aged effect. A piece of ribbon was coloured with DI and tied into a bow to complete the vintage feel.


I'm also going to show my work at: That Craft Space blog challenge
                                                                       Simon Says Stamp and Show
                                                                       Let's Ink It Up:Challenge #2
                                                                       Allsorts Challenge Blog
                                                                      
If you like this piece of work, I'd love you to leave a comment. Thank you.

Thursday 8 March 2012

Birds

I found a lovely blog called Tag Tuesday. Although I'm not a member I loved the theme and the work shown is gorgeously creative - such inspiration for me! Tags are one of my favourite projects to make as you can do so much in a small space and it doesn't take forever.  I'm going to ask if I can play along just as a visitor.

The theme for the tag is BIRDS. I love watching the birds in my garden, particularly the little robins. I have a lilac tree where tiny little wrens hide, flitting in and out. These were the inspiration for my tag. My bird stamp looks more like a magpie but I've used coffee archival to at least get the colour right - with lots of imagination I hear you say! I'm surprised I get any birds in my garden due to the magnificent Frankie who patrols all borders with great diligence - he's not as quick as he used to be and fingers crossed, hasn't caught a little feathered friend for quite some time!

The main elements made ready for assembly - blank die cut shows the decorative 'frame' I used at the top and bottom of the tag. I coloured the tag background - after scrunching it up - using Distress Inks, my only Distress Ink stain (Picket Fence), mesh design stamped in platinum Brilliance and greenery stamped using Versafine. I then ironed it as flat as I could but perhaps I should have used more pressure!


The finished piece - really need to improve my photograpy skills I think!
Detail of the lower frame made by stamping with Versafine, inking with Distress Inks and then two layers of Utee to make a smooth, glossy contrast to the texture on the main body of the tag. The frame at the top of the tag has been made in the same way.


The tree was made using an embossing folder piece which I cut out , inked and embossed using true white and gold to give light and sparkle. I've tried to place the little birds hiding in amongst the branches. They too were stamped, cut out and given two coats of Utee. (my apologies for a somewhat 'fuzzy' picture - reflects how I've felt in the last week!).
The top of the tag has a matching frame to the lower end, a kitchen towel leaf and for good measure, I inked the punched hole reinforcer, gave it a coat of Glossy Accents and finally tied some green ribbon through as a finishing touch.

Back From The Brink. . . . . . . .!

Been under the weather for the last week or so - too poorly for a few days to even look at my laptop! The last few days have seen me blog hopping and admiring lots of lovely work. I've even managed to do some craft the last couple of days and as usual I've got a few half finished bits and pieces. Let's hope something comes together! ( I have finished one tag which I'm quite pleased with though!).